4 min to read
Creating a Reusable Hike Info Box in Jekyll
How to build a modular info box for hiking posts (or any category)
Introduction
In this post, I’ll explain how I created a reusable Hike Info Box for my hiking posts using Jekyll and the Jekflix theme. The system is modular and can be adapted to any category, whether hiking, tech tutorials, recipes, or music albums.
The main goals:
- Store metadata in the front-matter.
- Render a visually appealing info box with icons, animations, and badges.
- Only display the box for relevant posts.
- Make it easy to reuse for future posts.
Step 1: Add Metadata to Post Front-Matter
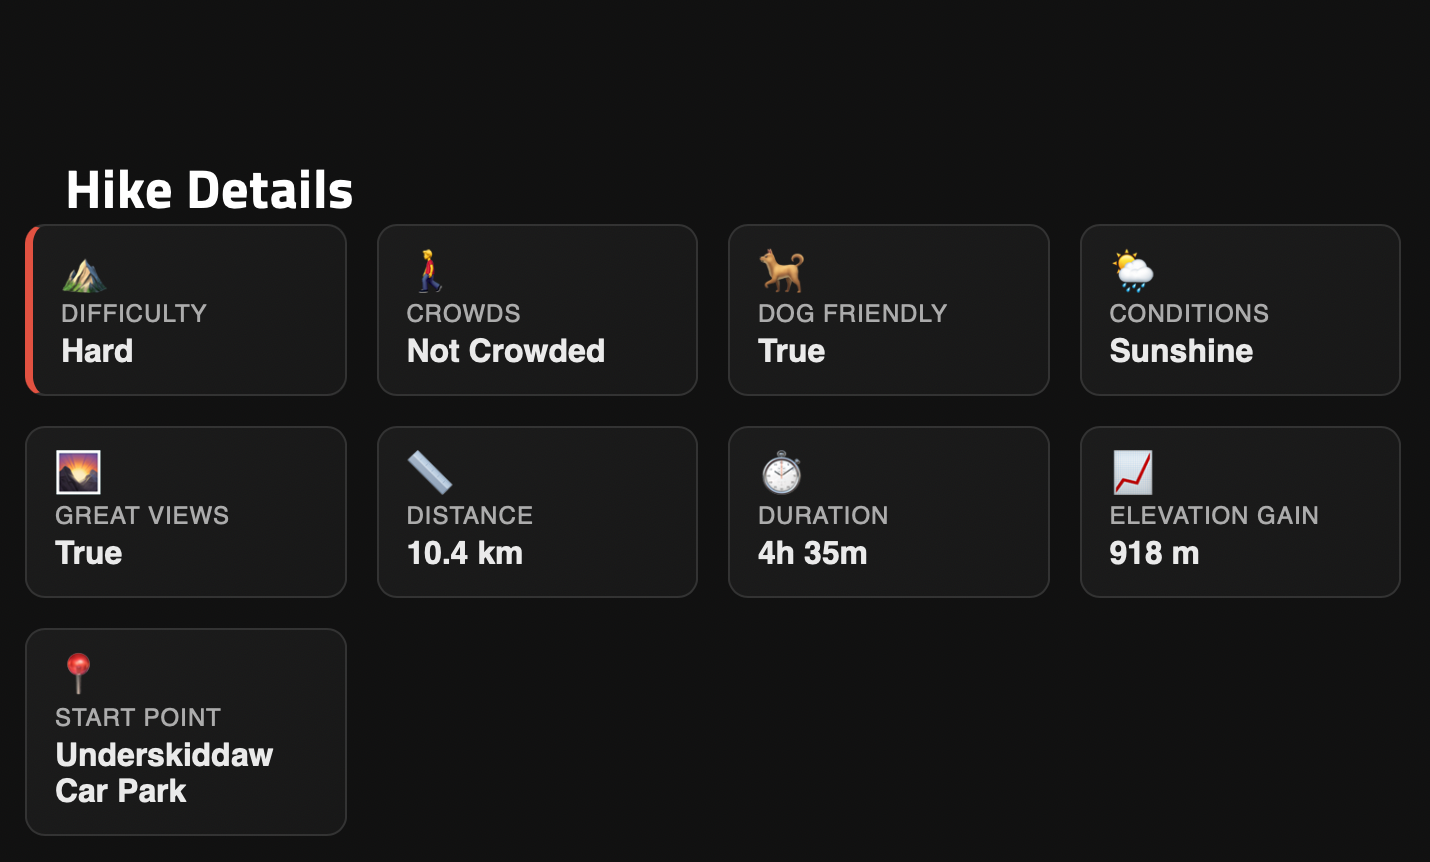
Jekyll posts allow custom variables in the YAML front-matter. For hiking posts, the metadata looked like this:
---
category: Hiking
difficulty: hard
crowded: Not Crowded
dog_friendly: yes
conditions: Sunshine
great_views: yes
distance: 10.4
duration: "4h 35m"
elevation_gain: 918
start_point: "Underskiddaw Car Park"
---
You can replace “Hiking” and the other fields with any category and relevant metadata.
Step 2: Create a Reusable Include
I created _includes/hike-box.html to dynamically render the info box based on front-matter variables:
<div class="hike-box">

  <!-- Repeat similar blocks for crowded, dog_friendly, conditions, great_views, distance, duration, elevation_gain, start_point -->
</div>
Tip: Rename the include and fields to create other info boxes (e.g.,
recipe-box.html,album-box.html) for different categories.
Step 3: Add CSS for Styling and Animations
The following CSS makes the box visually appealing:
.hike-box {
  background: #111;
  border-radius: 12px;
  padding: 20px;
  margin-bottom: 30px;
  animation: fadeIn 0.6s ease;
}

.hike-item {
  background: linear-gradient(135deg, #1c1c1c, #181818);
  padding: 12px 14px;
  border-radius: 10px;
  color: #eaeaea;
  display: flex;
  flex-direction: column;
}

.difficulty.easy { border-left: 4px solid #4caf50; }
.difficulty.medium { border-left: 4px solid #ff9800; }
.difficulty.hard { border-left: 4px solid #f44336; }

@keyframes fadeIn {
  from { opacity: 0; transform: translateY(10px); }
  to { opacity: 1; transform: translateY(0); }
}
You can adapt this CSS for other types of info boxes.
Step 4: Conditional Include in layouts/post.html
To ensure the Hike Info Box appears only for relevant posts:
{% if page.category == "Hiking" %}
  {% include hike-box.html
      difficulty=page.difficulty
      crowded=page.crowded
      dog_friendly=page.dog_friendly
      conditions=page.conditions
      great_views=page.great_views
      distance=page.distance
      duration=page.duration
      elevation_gain=page.elevation_gain
      start_point=page.start_point
  %}
{% endif %}
Reusability tip: Replace “Hiking” with any category, or check for tags:
Step 5: Creating a Reusable Template
For hiking posts, I created a template Markdown file with all metadata fields filled with placeholders. This allows me to:
Copy the template
Rename it with the post date and title
Update metadata and content
Serve the site immediately without touching code again
Step 6: Applying to Other Categories
This pattern can be reused for:
- Recipes →
recipe-box.html+ metadata likeprep_time,ingredients - Music albums →
album-box.html+artist,release_year,tracks - Tech tutorials →
tech-box.html+difficulty,language,estimated_time
Conclusion
Using this setup in Jekyll:
- Keeps posts modular
- Uses custom front-matter variables
- Renders reusable components dynamically
- Maintains separation of content, layout, and style
It’s flexible and works for any category.
Tips for Readers
- Keep all metadata in front-matter.
- Add images and content below the front-matter.
- Reuse includes for other categories by changing filenames and metadata.
- Use CSS and animations consistently to maintain design coherence.


Comments